What You'll Learn
Every track in 8Bit Forge hides a fully featured synthesizer behind the bb icon. This tutorial walks through all six tabs — OSC → FILTER → MOD → ENV → FX → ARP — so you understand what every knob does and how to combine them to design your own sounds from scratch.
Step 1 — OSC: The Sound Source
The Oscillator (OSC) tab is where sound is born. It generates the raw waveform that every other section then shapes. Four independent sections give you full control.
Waveform
The Type selector chooses your raw waveform:
- Sine — smooth, pure tone. Perfect for bass sub-frequencies and soft pads.
- Square — the iconic 8-bit sound. Hollow and buzzy, perfect for chiptune leads.
- Sawtooth — bright and rich in harmonics. Ideal for supersaw pads and basses.
- Triangle — warmer than Square, more character than Sine.
- Noise — white noise for percussion, wind and atmospheric textures.
Duty Cycle (default 50%) controls the pulse width for Square waves — narrowing it creates a nasal, thinner tone reminiscent of NES-era sounds. Phase shifts where the wave starts in its cycle, useful for layering.
Tuning
- Octave — shift pitch by full octaves (−3 to +3).
- Semi — shift by individual semitones. Great for harmonizing two tracks a third or fifth apart.
- Detune — micro-pitch offset in cents. Slightly detune two voices for a natural chorus.
- Pitch Env — how much the envelope affects pitch. Positive = pitch rises on attack (plucked feel).
- Glide — portamento time. Notes slide into each other — essential for acid basslines.
Unison
Voices stacks multiple copies of the oscillator. Combined with Detune and Spread, you get the fat "supersaw" texture used in synthwave, trance and cinematic scores. Try 8 voices · Detune 0.08 · Spread 60% on a Sawtooth.
Step 2 — FILTER: Sculpt the Tone
The Filter cuts or boosts specific frequencies. It is the single most powerful tool for moving a sound from "generic" to "character-defining". The XY pad lets you adjust cutoff and resonance simultaneously with one drag.
- Type — Low-pass (LP) removes highs, High-pass (HP) removes lows, Band-pass (BP) keeps a narrow band.
- Cutoff (X axis) — drag left to darken the sound, right to open it up fully.
- Resonance / Q (Y axis) — drag up for a sharp peak at the cutoff frequency. High resonance = self-oscillating "scream" typical of acid basslines.
- Filter ENV — the envelope shapes how the filter opens and closes over each note's lifetime.
- Filter LFO — automatically sweeps the cutoff at a set rate, creating the classic "talking synth" or auto-wah effect.
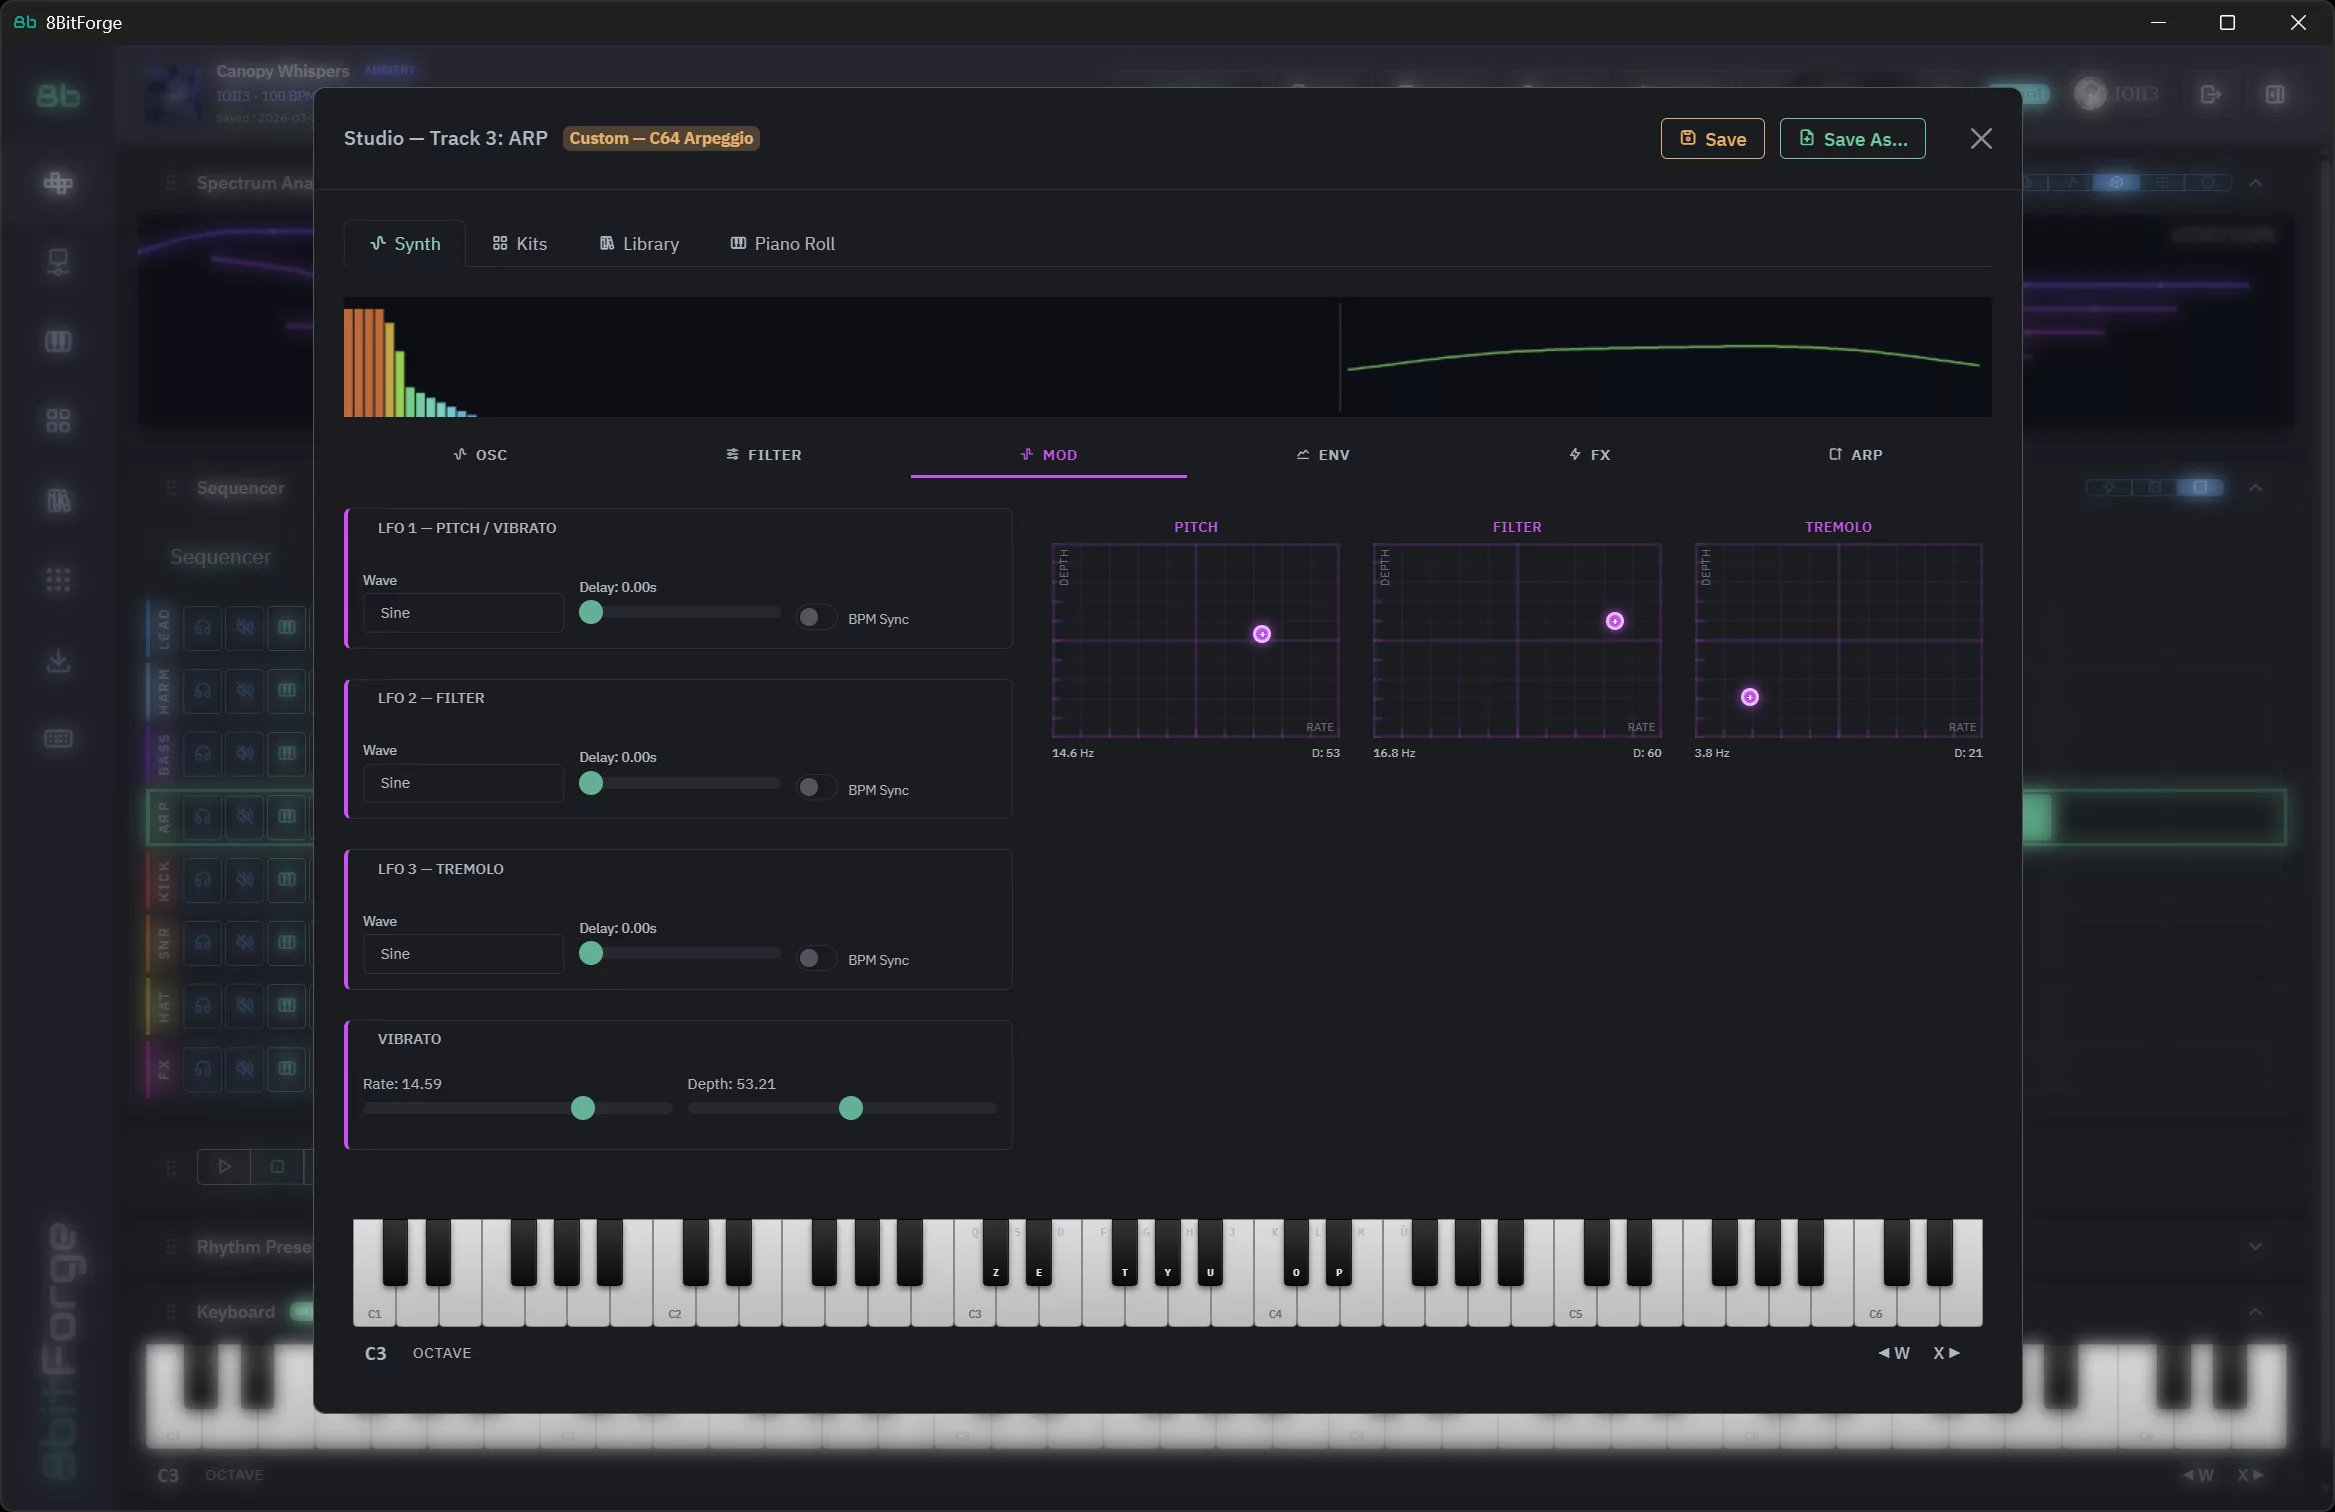
Step 3 — MOD: Add Movement
A static sound gets boring fast. The Modulation (MOD) tab introduces life by automatically changing parameters over time using an LFO (Low Frequency Oscillator).
- LFO Rate — how fast the LFO cycles. Slow (0.5 Hz) = sweeping pads. Fast (8 Hz) = vibrato/tremolo.
- LFO Depth — how far the LFO moves the target parameter. Zero = no effect.
- Destination — what gets modulated: Pitch, Filter Cutoff, Volume, or Pan.
- Sync to BPM — locks the LFO to the project tempo so sweeps hit in time with the music.
Step 4 — ENV: Shape the Envelope
The Envelope (ENV) tab controls how the volume behaves from the moment a note is triggered to when it fades out. The classic ADSR model gives four stages.
- Attack — time from note-on to full volume. Short = sharp, punchy. Long = gradual fade-in (strings, pads).
- Decay — time to fall from full volume to the Sustain level.
- Sustain — volume held while the note is held. Set to 0 for a pluck that dies immediately.
- Release — how long the sound fades after the note is released.
Step 5 — FX: Add Polish
The FX tab applies per-track effects after the synthesizer engine. Non-destructive — change or bypass at any time.
- Reverb — adds physical space. Small room for presence; large hall for cinematic ambiance.
- Delay — echo effect. Sync to BPM for rhythmic delays that sit perfectly in the groove.
- Chorus — detunes and delays copies of the signal for width and warmth. Excellent on pads and keys.
- Distortion / Bitcrusher — adds harmonic grit. Bitcrusher reduces bit depth for authentic lo-fi chip crunch.
Step 6 — ARP: Automatic Arpeggios
The Arpeggiator (ARP) tab turns held chords into automatic note patterns — the secret behind many classic chiptune melodies.
- Mode — Up, Down, Up/Down (ping-pong), Random, or As Played.
- Rate — arpeggio speed: 1/8, 1/16, 1/32 etc., always synced to BPM.
- Octave Range — how many octaves the arp spans. 2 = sweeping, spacious feel.
- Gate — note length. Short gate (0.2) = staccato chip bleeps. Long gate (0.9) = smooth legato run.
Putting It All Together
Here's a complete patch — supersaw lead with filter sweep and delay:
- OSC → Type: Sawtooth · Voices: 4 · Detune: 0.08 ct · Spread: 60%
- FILTER → Type: Low-pass · Drag XY pad to center (Cutoff ~55%, Q ~30%)
- MOD → Destination: Filter Cutoff · Rate: 1/4 sync · Depth: 35%
- ENV → Attack: 10 ms · Decay: 200 ms · Sustain: 70% · Release: 400 ms
- FX → Reverb: 20% · Delay: 1/8 sync · Chorus: 15%
- ARP → Off (play direct chords or notes from the sequencer)
Press Play, trigger some notes and listen to the filter sweep breathe in time with your groove.
What's Next?
- Kits tab → explore pre-built drum kits and swap individual sounds
- Library tab → browse 170+ presets as starting points
- Master FX → bus-level reverb, delay and EQ across the whole mix
- Arrangement view → chain patterns into a full song
Now that you understand the synth engine, every sound in 8Bit Forge is within reach. 🎛️